The cinematic warmth you’ve been chasing—finally dialed in.
I used to avoid golden hour.
Not because I didn’t love it… but because every time I tried to edit it, it looked wrong.
Either the skin tones turned radioactive orange, or the shadows got muddy.
Everything looked like a failed attempt at “moody”—and not in a cool way.
Sound familiar?
You fall in love with that perfect soft light…
…you open Lightroom…
…and suddenly your beautiful moment turns into a soup of crushed blacks, neon yellows, and overcooked highlights.
Editing warm tones should be easy, right?
Enter: Sunset Blvd
This preset was made as a direct response to that frustration.
It gives you that dreamy, nostalgic warmth—
While protecting what matters most: natural, creamy skin tones.
Deep shadows.
Rich amber glow.
A cinematic, vintage softness that doesn’t fall apart under pressure.
What this tutorial gives you:
🛠 The exact settings we used in Lightroom.
⚙️ A full breakdown—from exposure to tone curves to grain.
🎯 Plus the 5 refinements we made to turn the one-click preset into a finished masterpiece.
You can follow along step-by-step—
or skip the trial-and-error and grab the Lightroom Preset Playground, which includes Sunset Blvd and a bunch of other ready-to-click styles.
This isn’t just a preset.
It’s a creative safety net.
You’ll finally get the look you want—without ruining what matters.
📸 Let’s get going and let’s make art.
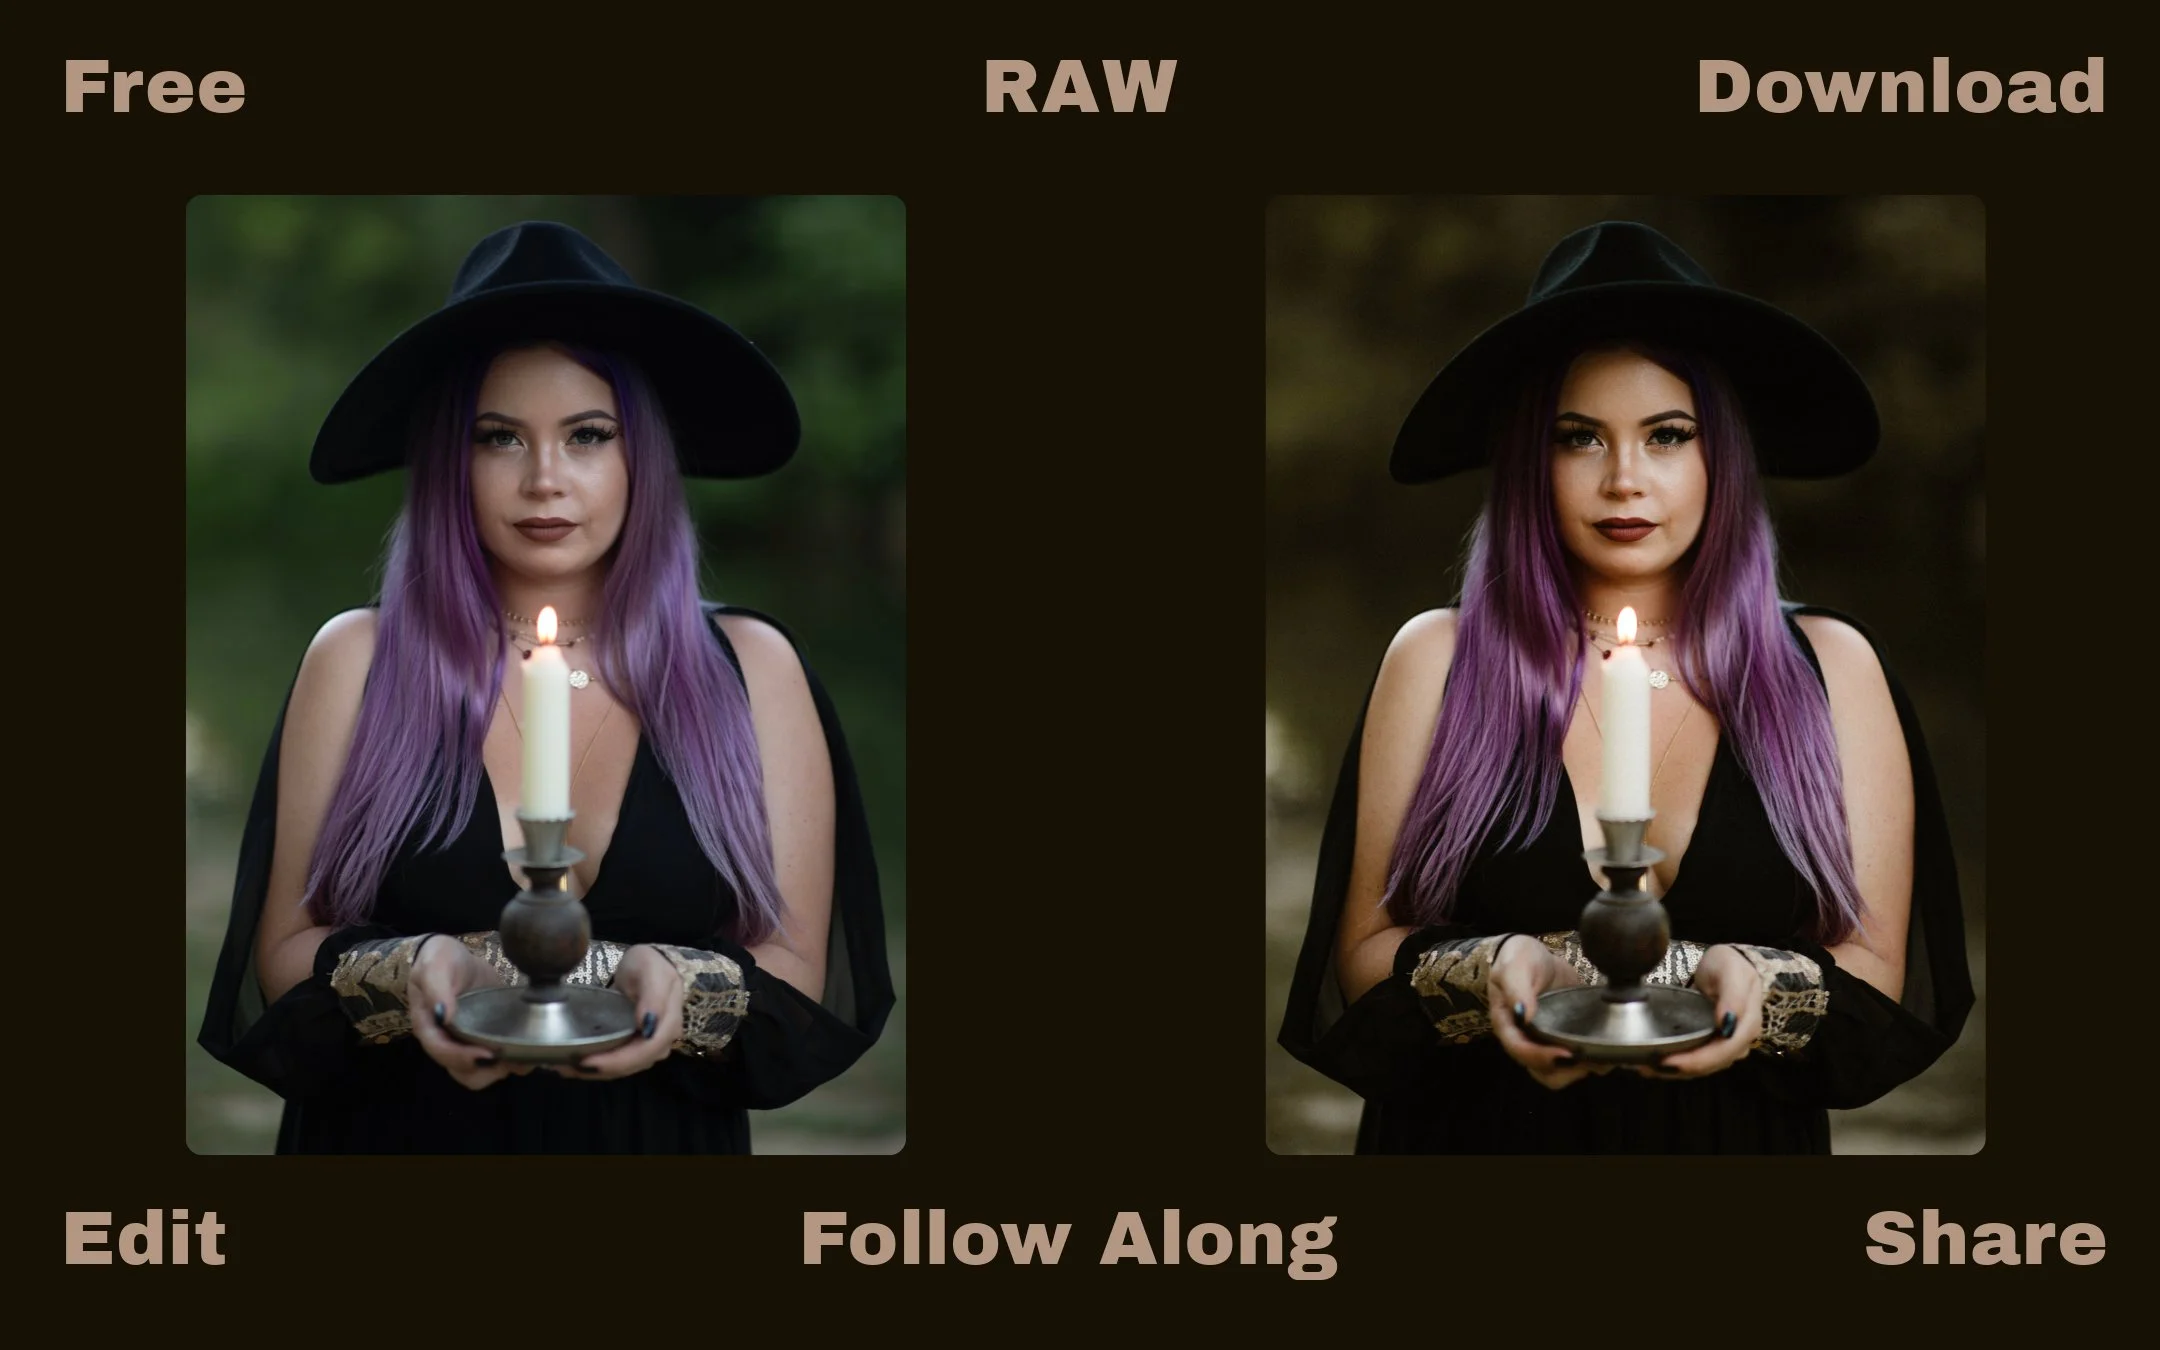
💡 Follow Along: Download the RAW file for free and edit alongside me to get these exact results—or take it in your own creative direction. If you do, tag me in your edits! I love seeing Your Version!
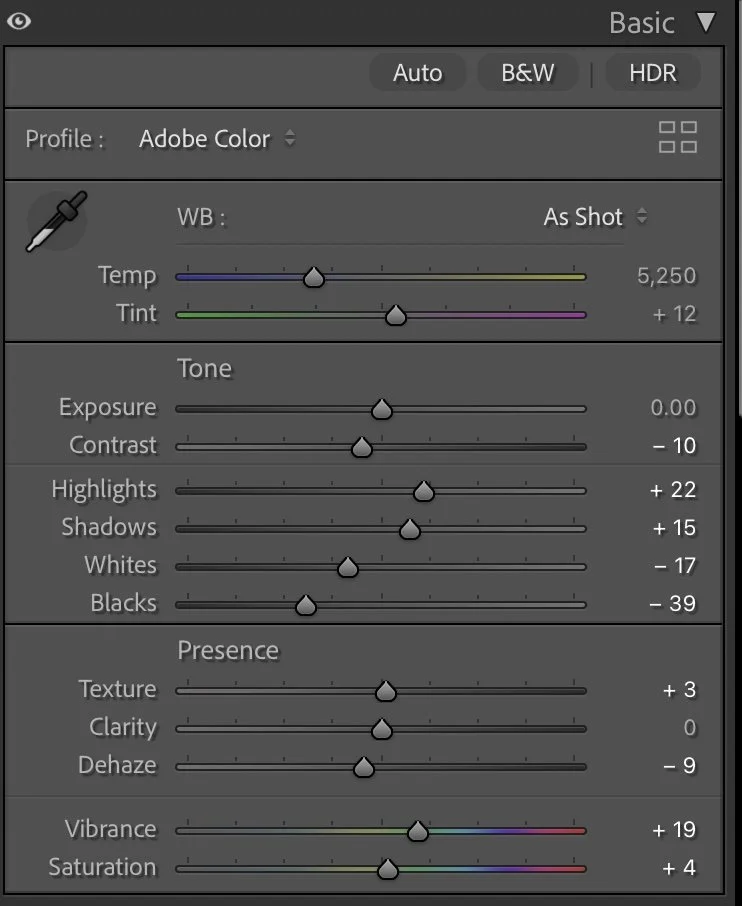
Step 1: Light Adjustments (One-Click Preset)
• Exposure: Leave neutral (0)
• Contrast: Softened (-10)
• Highlights: Raised (+22)
• Shadows: Slightly opened (+15)
• Whites: Pulled down (-17)
• Blacks: Deepened (-39)
You’re laying the foundation here—this is the Sunset Blvd base look: warm, soft contrast, and a cinematic shadow roll-off.
💡 Why it works: These settings carve out drama without going harsh. The blacks get inky and moody, while the highlights glow softly—like walking down a sun-drenched street just before dusk.
Step 2: Color Adjustments (One-Click Preset)
• Temperature: Auto-adjusted (likely warm around 6000–6500K)
• Tint: Neutral or slight magenta
• Vibrance: Increased (+19)
• Saturation: Boosted slightly (+4)
This is where the emotional temperature sets in—Sunset Blvd leans into golden, nostalgic tones.
💡 Why it works: That combo of warmth + rich vibrance creates a dreamy late-summer vibe. It pulls colors together into a unified palette, while still preserving skin tone detail.
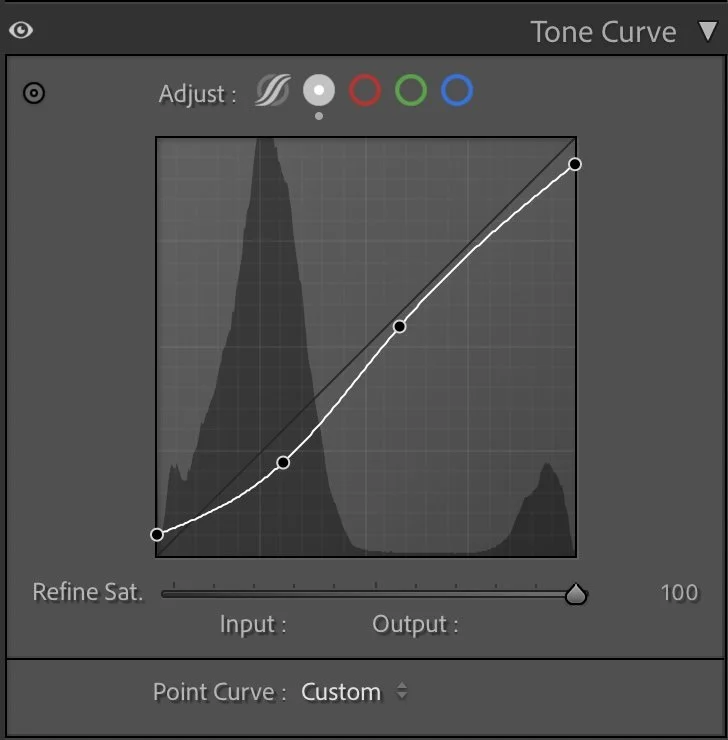
Step 3: Tone Curve Magic (One-Click Preset)
• Point Curve (RGB): Soft S-curve
• Key points: 0,13 → 77,57 → 148,140 → 255,239
• Red/Green/Blue Curves: Linear (untouched)
You’re getting most of the contrast and depth here. This curve subtly lifts the shadows and compresses highlights—hello cinematic mood.
💡 Why it works: You don’t need to overthink tone curves with Sunset Blvd—it’s already baked in. Soft contrast + filmic roll-off = magic.
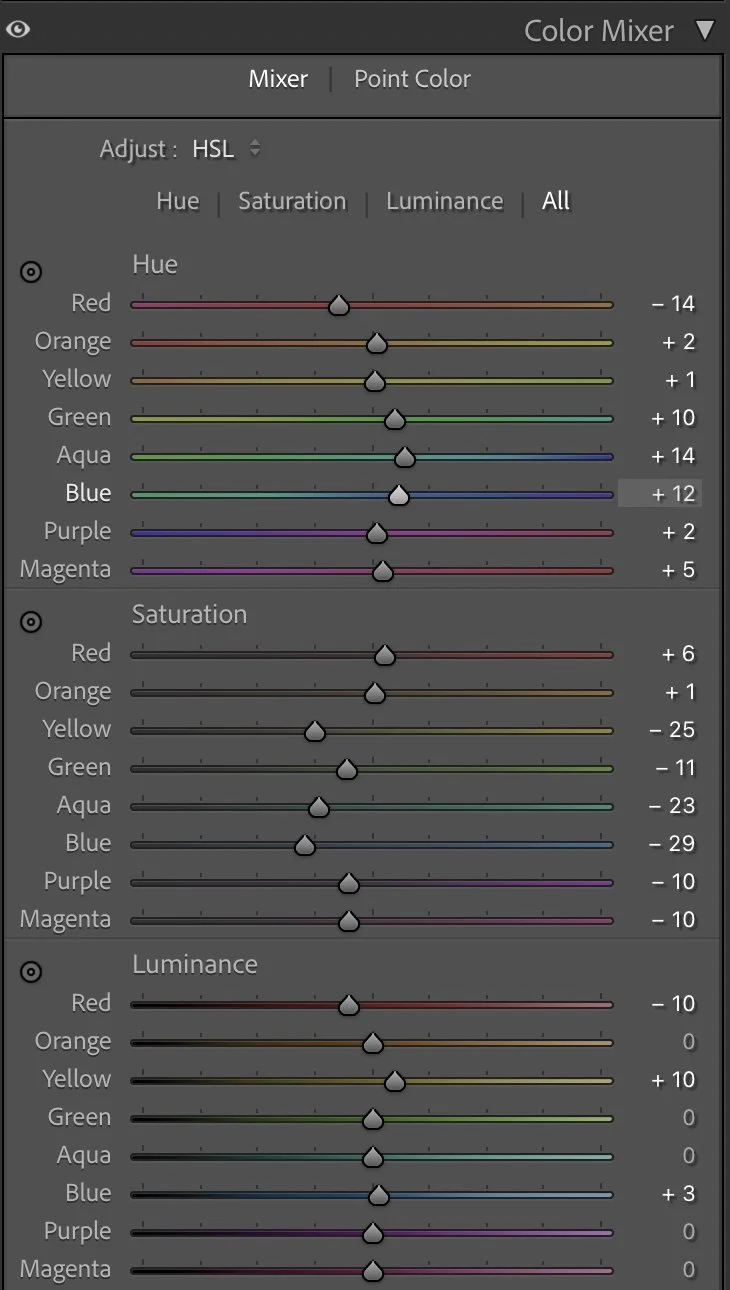
Step 4: Color Mixer Tweaks (One-Click Preset)
Hue
• Red: -14
• Orange: +2
• Yellow: +1
• Aqua: +14
• Blue: +12
Saturation
• Yellow: -25
• Aqua: -23
• Blue: -29
Luminance
• Yellow: +10
• Blue: +3
• Red: -10
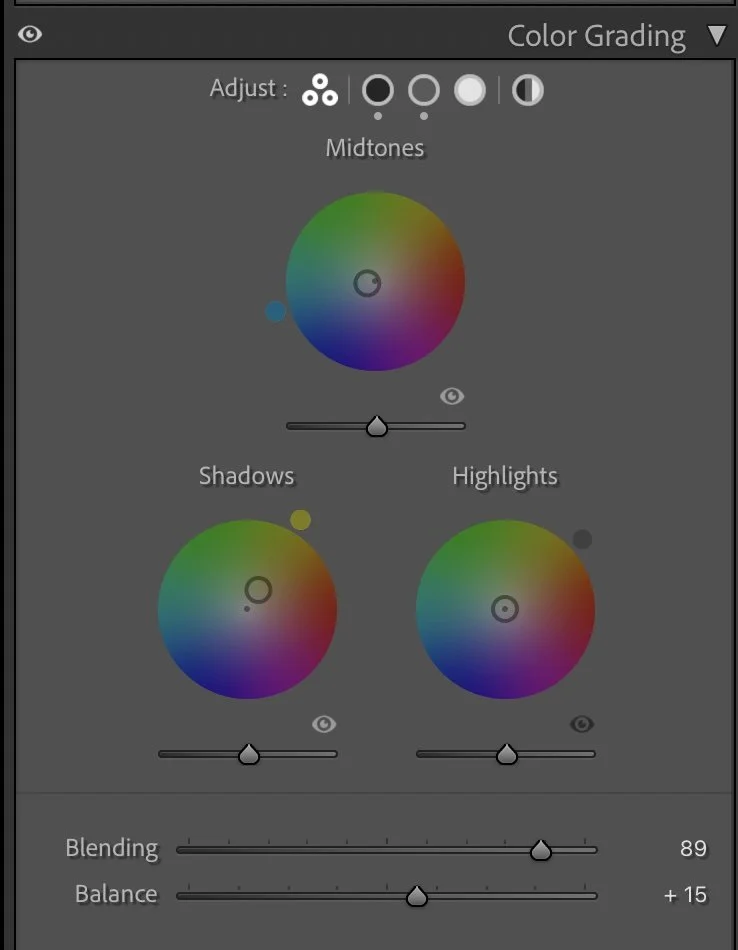
Color Grading
• Color Grading Midtones: Hue 197 + Sat 9 = cool blue midtone wash (but softly blended—Blending 89!)
• Grain 30 / Size 12 / Frequency 57: Adds that nostalgic film-like texture.
• Shadow Tint -3: Ever so slightly warms up the shadows.
This is your mood board in slider form. You’re muting cool tones, gently warming up skin, and pushing color into that editorial space.
💡 Why it works: The desaturation of blues + lift in yellows gives this preset its signature “sun-drenched without being tacky” feel. Bonus: skin looks creamy, not crispy.
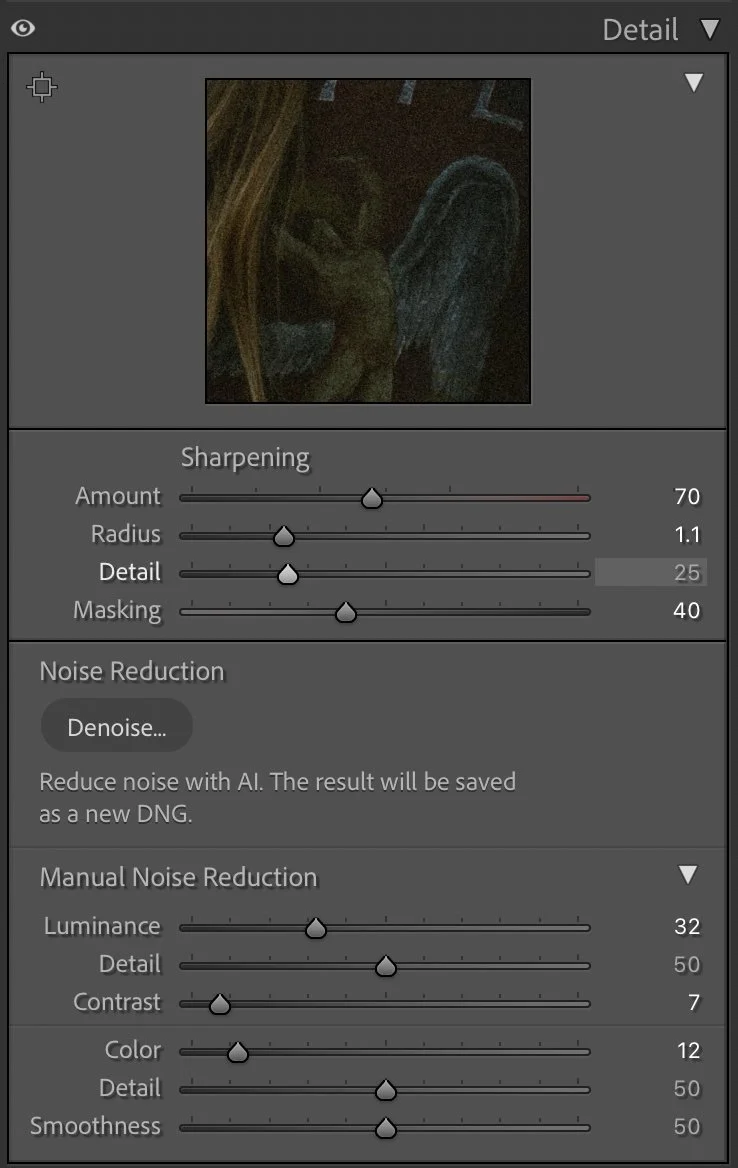
Step 5: Effects & Final Texture (One-Click Preset)
• Texture: +3
• Dehaze: -9
• Grain: 30 Amount, 12 Size, 57 Frequency
• Noise Reduction: Luminance 32, Color 12
• Sharpening: 70 Amount, Radius 1.1, Masking 40
A soft kiss of grain and dreamy haze gives this preset its gentle analog vibe.
💡 Why it works: Texture stays natural, not crunchy. The grain mimics film without overpowering. This is your “looks expensive” layer.
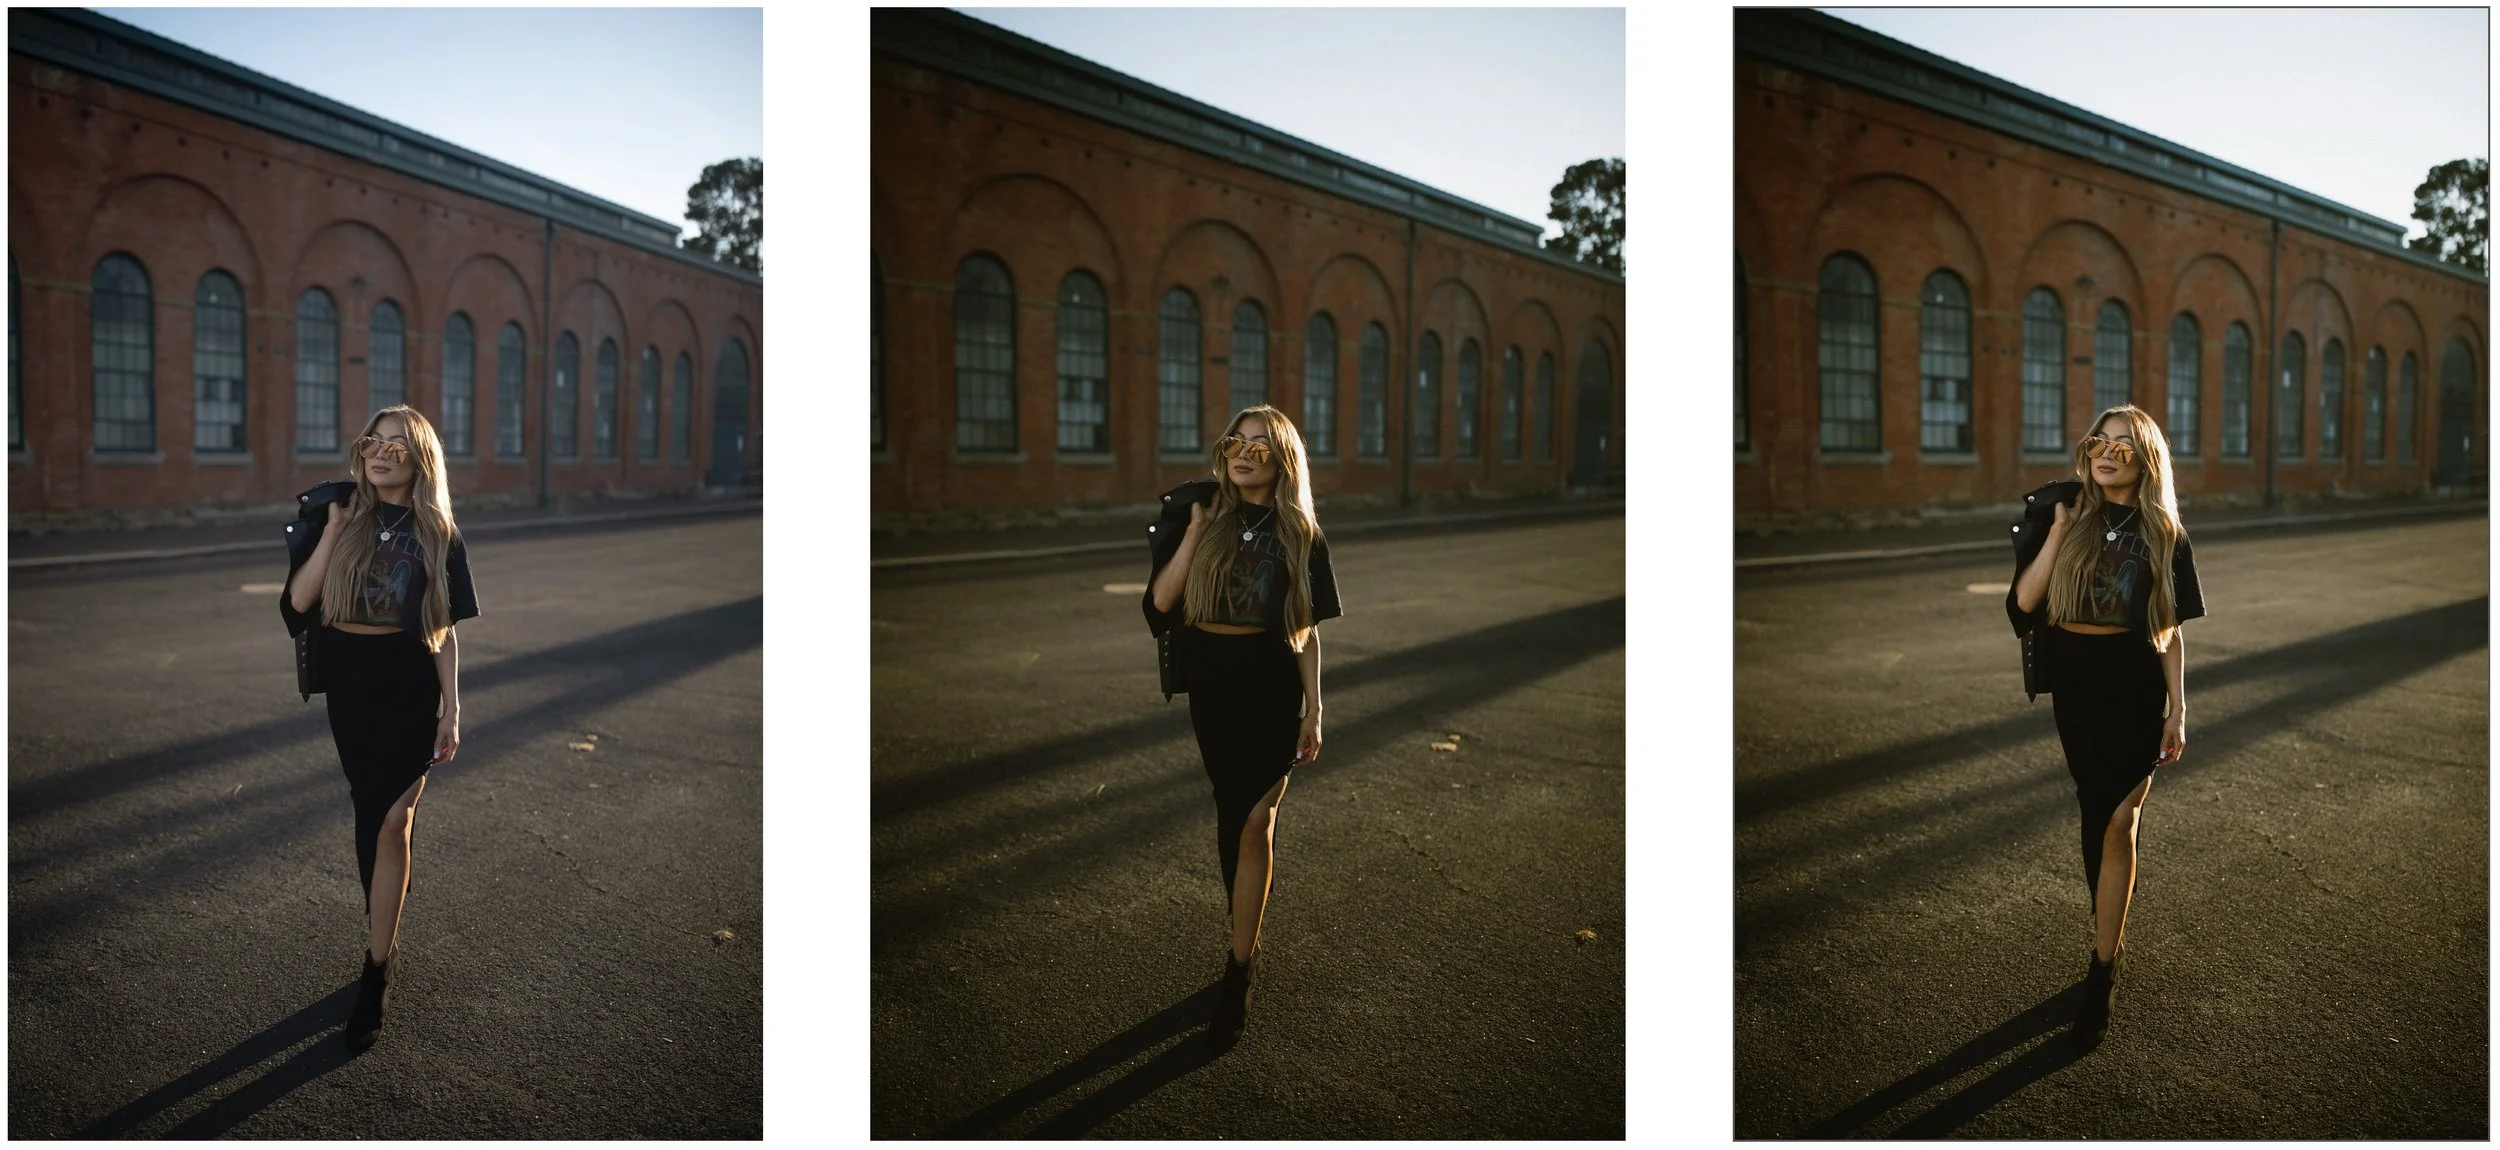
Here’s where we’re at so far…
Remember, you can get here with one click.


Final Polish: Your Manual Adjustments
The Sunset Blvd preset set the tone beautifully—but here’s what you did next to really finesse the final image:
• Whites: Nudged closer to 0 for more pop in bright areas
• Shadows: Slightly pulled down (~+5) to deepen contrast
• Temperature/Tint: Balanced green-magenta cast for cleaner skin
• Orange Hue: Adjusted toward neutral for more accurate tones
• Grain: Possibly softened for a smoother finish
• Local Adjustments: Clone stamp distracting elements
It’s like Sunset Blvd gave you the stage lighting—and you adjusted the spotlight to shine exactly where you needed it.


And Here’s The Final Result…

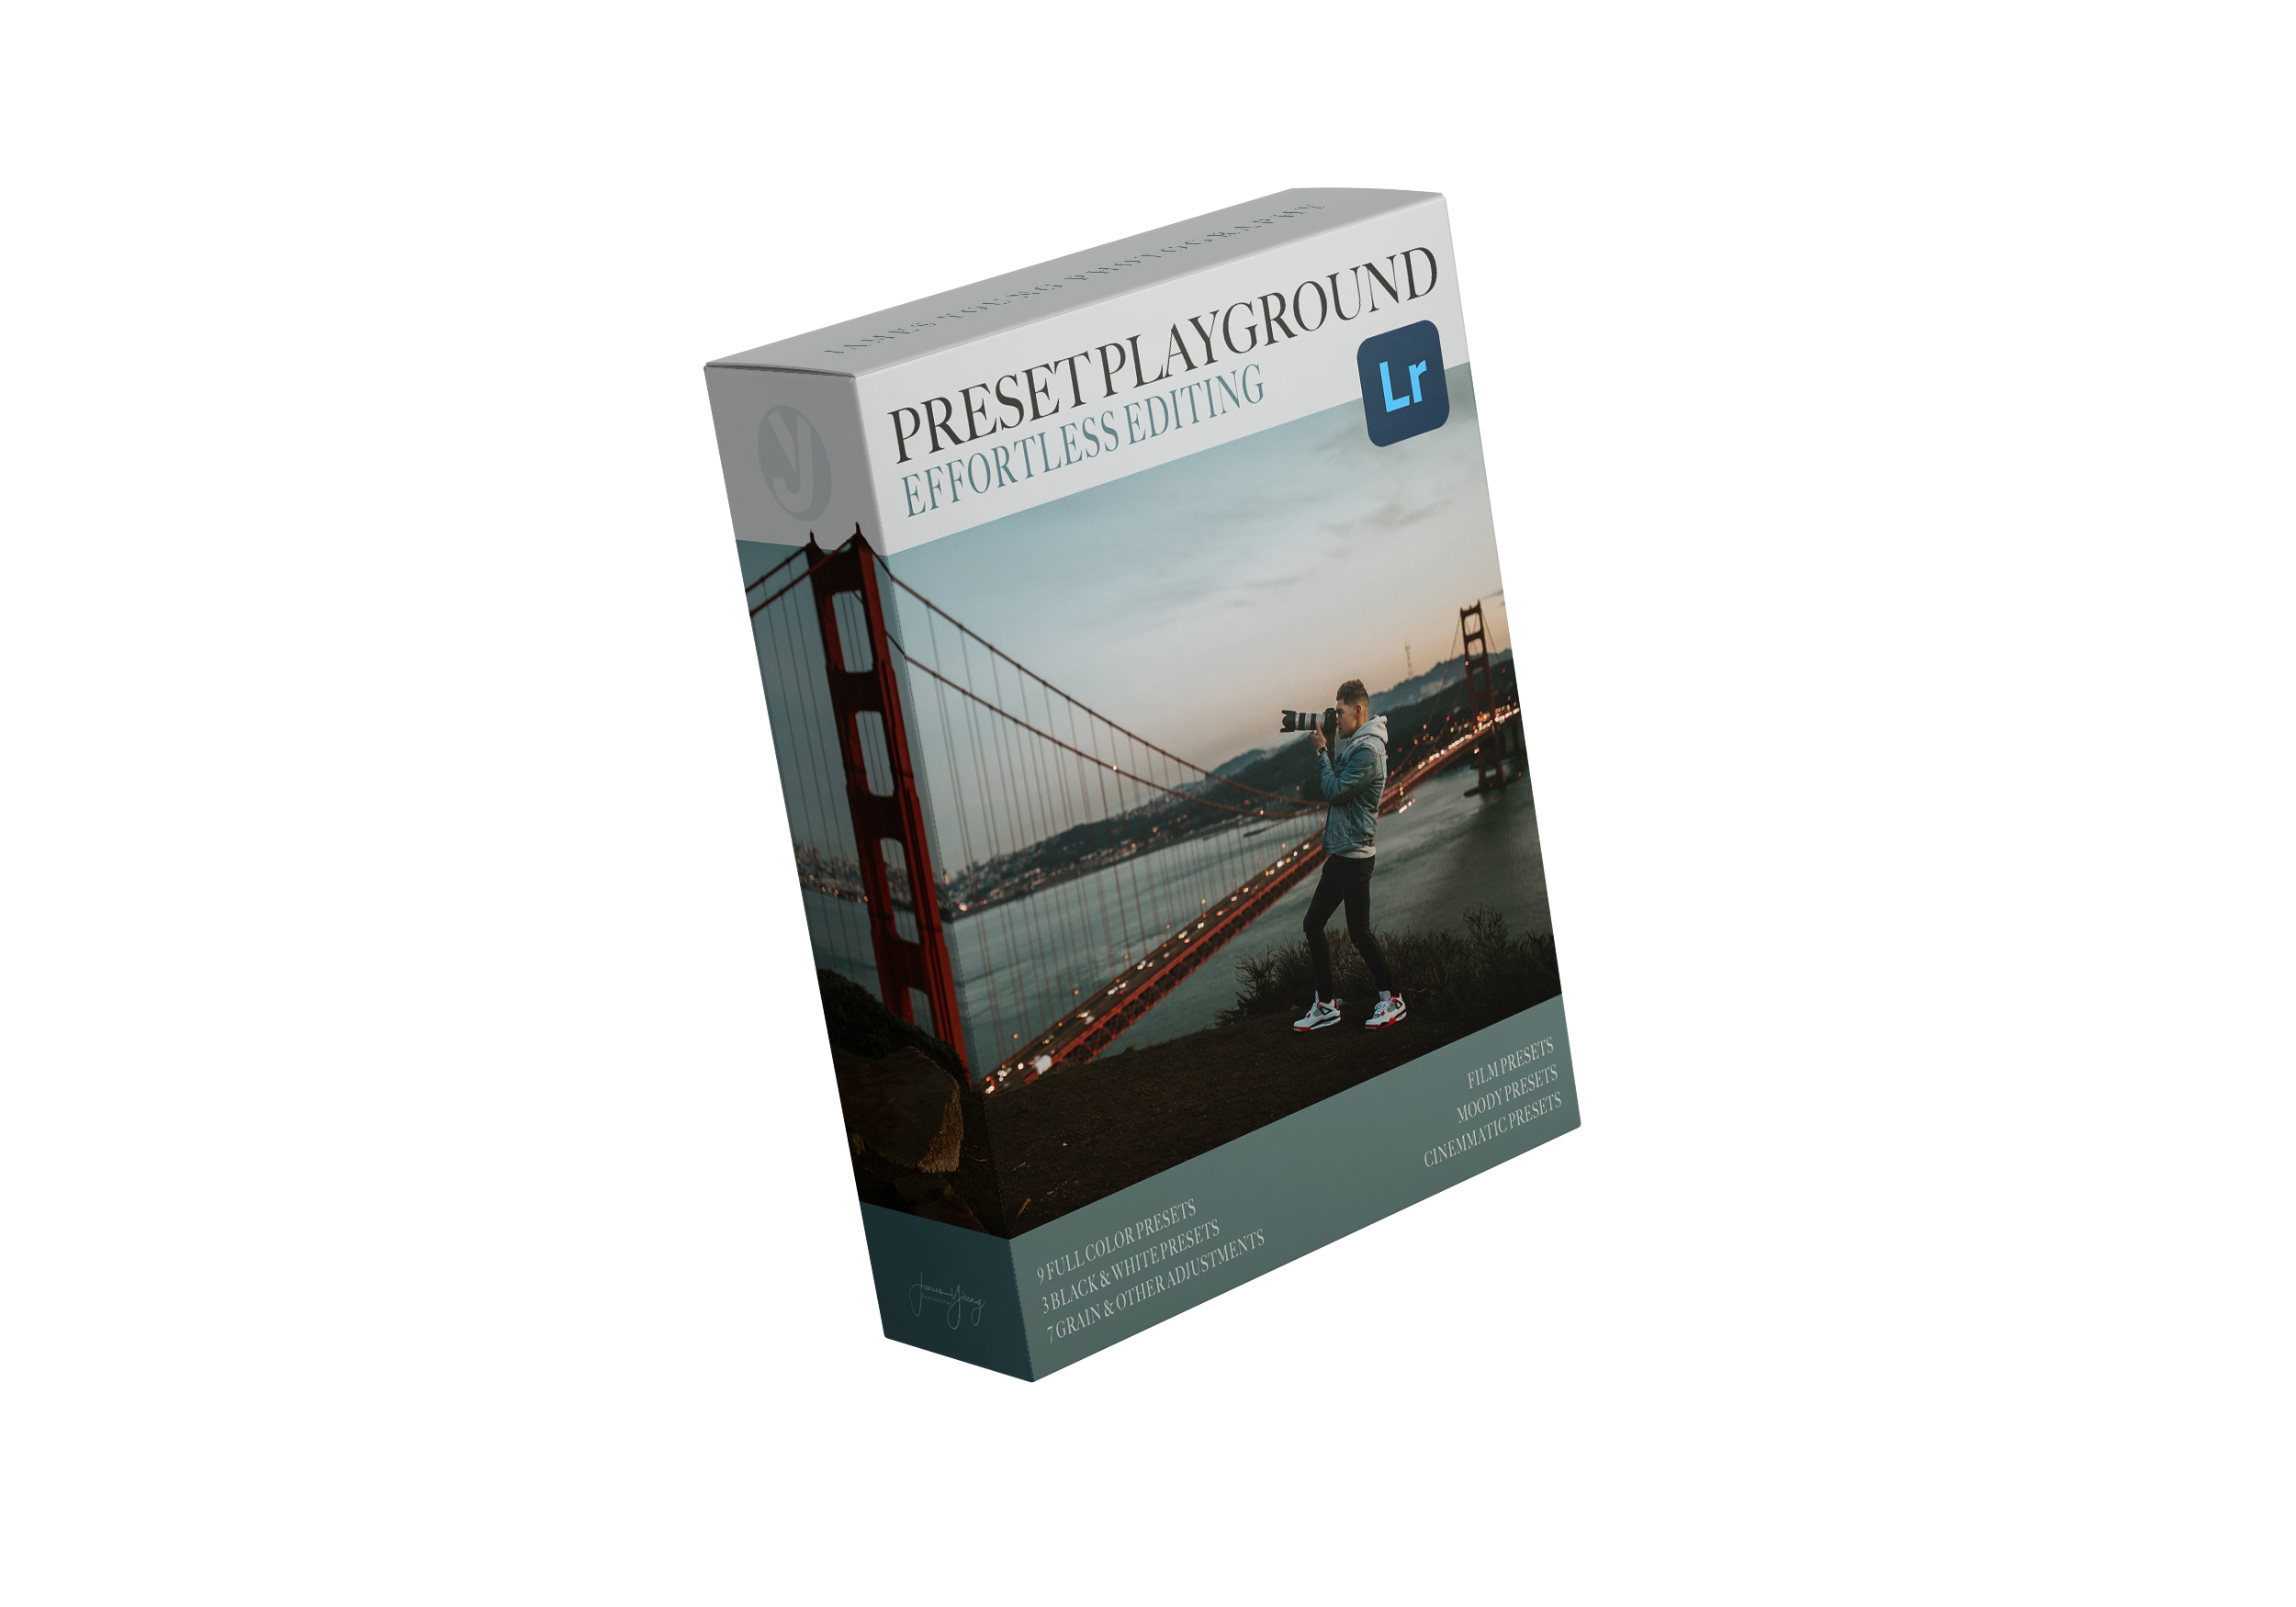
Lightroom Preset Playground
Sunset Blvd is part of the Lightroom Preset Playground—designed for photographers who want that rich, cinematic look without the guesswork.
Perfect for:
• Golden hour portraits
• Editorial fashion
• Streetwear vibes
• Moody lifestyle sessions
🔥 One click = 90% there
🎯 Intuition = the final polish
This preset collection includes:
📷 4 Film-Inspired Looks – Kodak-style warmth & nostalgia.
🎥 3 Cinematic Styles – Inspired by real Hollywood color grading. (Including Wine Country… The one we used for this edit!)
🌫 2 Moody, Desaturated Styles – Think Pacific Northwest & rich editorial tones.
3 Black & White Presets – Custom-built for different lighting conditions 🖤
7 Adjustment Presets – Edit Faster & Experiment More 🎛
AND it comes with a FREE, *30 PAGE* E-Book that fully breaks down every adjustment on every preset.
The only preset pack that helps you learn, experiment and grow your confidence in editing.
Learn more about the Lightroom Preset Playground.
Final Thoughts
The truth is—you don’t need to be an editing wizard to create stunning, professional-looking photographs.
You just need:
• A solid starting point (hi, Sunset Blvd 👋)
• A clear breakdown (you’ve got that now)
• And the courage to experiment
This tutorial wasn’t just about sliders.
It was about giving you permission to stop second-guessing, trust your creative gut, and build the confidence to shape light the way you see it in your mind.
See you next time!