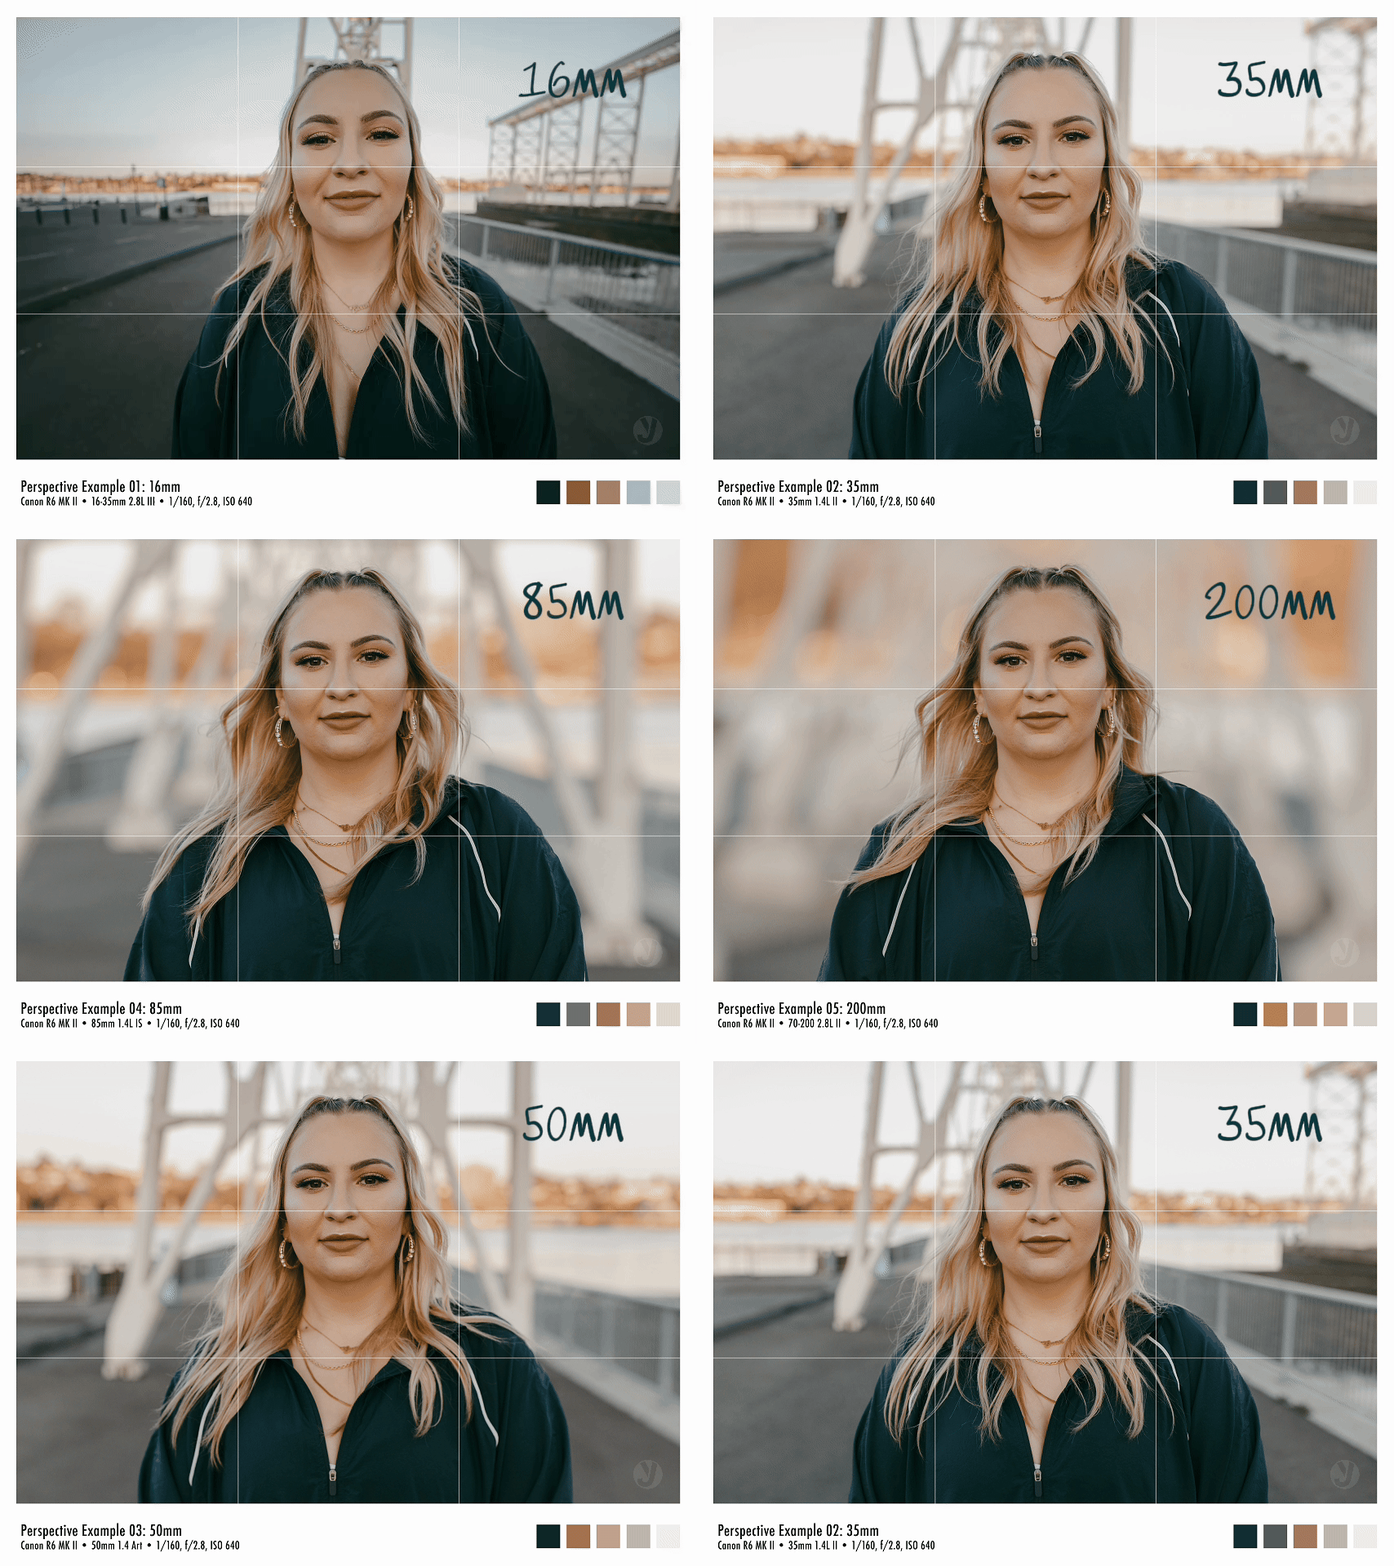
In addition to focal lengths changing how much you see; they change how objects relate to each other in an image. This set of portraits demonstrates how perspective distortion and background compression shift as the focal length changes.
📌 Important Note: We’re not talking about barrel distortion (the warping effect of ultra-wide lenses when straight lines warp near the edges). This is purely about how your distance from the subject and the lens’s field of view impact the image.
Perspective distortion happens because of where you stand, the viewing angle of your lens, and how much your subject fills your composition, not just the wide angle lens itself.
The focal length of a lens can change how a portrait feels. The way a face is shaped, how much background you see, and how close or far things feel all depend on your focal length and where you’re standing.
This series of images shows the same portrait taken with different lenses, from 16mm (ultra-wide) to 200mm (telephoto). Let’s break down how each one affects the image.
16mm (Ultra-Wide Angle)
Field of View: Extremely wide. You basically see everything the lens is pointed at. 😳
Perspective Distortion: The subject’s face appears stretched, with the center (nose, lips) pulled forward, and edges (ears, jaw) pushed back. You can almost “feel” the tip of her nose. Rather unsettling.
Why? To fill the frame, you have to be really close, which exaggerates depth.
Background Effect: Lots of environment, everything looks far away and less blurred.
At 16mm, you have to stand very close to fill the frame. This makes anything close to the lens appear larger, while things farther away appear feel distant and smaller. This distorted look happens because of how close I was to my subject, not just because the lens is wide.
✅ Best Used For: Environmental portraits where the background is just as important as the subject. Not ideal for close-up faces unless you want a dramatic, almost surreal effect.
For more examples on creating portraits with an ultra wide angle lens, check out:
35mm (Wide-Angle Portrait)
Field of View: Still wide, but less extreme.
Perspective Distortion: More natural but still a slight depth exaggeration. Features are slightly exaggerated.
Why? You can stand slightly farther back than at 16mm, reducing the perspective distortion.
Background Effect: More balanced—background is still visible but doesn’t feel too distant.
✅ Best Used For: Candid street photography, lifestyle portraits, or when you want both the subject and background to play a role in the composition together.
For more examples on creating portraits at 35mm, check out:
50mm (Medium Range Perspective)
Field of View: Feels close to what the human eye sees.
Perspective Distortion: Minimal. Facial proportions look natural.
Why? You’re standing at a comfortable distance from the subject, so their features aren’t stretched or compressed.
Background Effect: The background is starting to separate and blur a lot more, making the subject stand out more.
✅ Best Used For: General portrait work. It let’s us balance between including the environment and keeping focus on the subject. 50mm is great for medium range storytelling. You don’t have to stand too close or too far to great great photos at 50mm. For more examples on creating at 50mm, check out:
Don’t forget to sign up for more photography guides, breakdowns, and business insights!
85mm (Classic Portrait Lens) and My Personal Favorite
Field of View: Narrower, smaller view on the subject.
Perspective Distortion: None. Facial features look natural and flattering.
Why? You’re standing further back, keeping proportions intact.
Background Effect: Stronger separation—background blur increases, making the subject pop even more.
✅ Best Used For: Professional headshots, beauty portraits, or any shot where you want full attention on the subject with a creamy, blurred background.
200mm (Telephoto Portrait)
Field of View: Very tight or narrow field of vision. Only the subject fills the frame.
Perspective Distortion: None. In fact, the entire image appears “compressed,” making the subject and background start to feel closer together. Sometimes this visual effect is referred to as a “flatter” looking photo.
Why? Long focal lengths create this visual “pulling in” of the background, and they compress perspective—objects that are far away appear larger, closer and... You get more Bokeh!
Background Effect: Maximum blur and separation. Background details are gone, leaving only smooth tones.
✅ Best Used For: Intimate portraits, cinematic close-ups, or when you want to isolate your subject completely.
Key Takeaways
1️⃣ Perspective distortion happens because of where you stand, not just the focal length. At 16mm, you’re super close, so depth gets exaggerated. At 200mm, you’re far away, so everything flattens. Perspective distortion happens because of where you stand, not just the lens itself.
2️⃣ Background compression makes distant objects feel closer and blurrier as the focal length increases. This is why telephoto portraits (85mm and beyond) feel more polished and professional. That background separation is found in most professional couples, wedding and portrait photography.
3️⃣ Each focal length tells a different story. Wide angles show environment and energy. Mid-range lenses balance realism. Telephotos isolate and flatter.
What This Means for Your Photography
✅ 16mm is bold and exaggerated. Great for storytelling and dramatic angles. But if you’re too close, expect some facial warping.
✅ 85mm+ is flattering and cinematic. Perfect for classic portraits with smooth background blur.
✅ Wider lenses include more scene; longer lenses isolate the subject.
✅ Your distance matters. If you shoot 35mm from far away and crop in, it’ll look closer to an 85mm shot.
Your lens is a tool, not a rule. Mastering focal length isn’t about picking “the best” one—it’s about knowing what kind of story you want to tell.
Thank you to Courtney for modeling for this experiment.
I hope this was helpful!
Continue Learning
Lightroom Tutorials
Photography Business Related


